Thank you so much for the support that you have shown towards the first post of the Photography Series. Your emails and comments on Understand and Play with Light are much appreciated. I hope I have answered all your queries. Today, we will talk about three important elements - Understanding ISO, Aperture and Shutter Speed. It plays a vital role in making a picture It’s a long post with lots of information and details to talk about. If you are new to this, it might take some time to understand and grasp it. When I started photo-shooting in Manual mode, I read these details again and again for months to figure it out and I am still reading, still learning.
The three key elements that work as a chemical process to create an image are ISO, Aperture and Shutter Speed
I will start by explaining each one of them. Then we will see how they are connected to each other and how we can create a balance.
ISO
It stands for International Organization of Standardization. Inside your digital camera, there is a component called ‘image sensor’ which collects the available light and creates an image. ISO measures the sensitivity of the ‘image sensor’ and accordingly reacts to the available light. ISO ranges from 100 – 6400 and can go even beyond depending on how advanced your camera is.
In the below set of photos, I kept changing the ISO but the rest of settings were not changed. This would give you an understanding of how the image sensor reacted to the light.

In the example below, I changed the shutter speed to get a similar end result even though it was shot with a different ISO. When we discuss shutter speed later, we will see how it works. Right now, concentrate on how the picture that was shot with ISO 3200 looks grainy and has noise in the background unlike the one photographed with ISO 400 which is smoother and detailed.
The lower the ISO, the lesser the sensitivity. The higher the ISO, the more the sensitivity and hence, more noise or grain.

In a bright daylight I usually stick to ISO 100 or 200. When I click at night or in a very dark place, I have to increase the ISO to maximum, if required. While there are some who don’t like noise, there are some who would add noise while post processing. It’s an individual’s choice.
Aperture
Every lens has an opening through which light travels to the image sensor. The size of the opening is referred to as Aperture and it determines the amount of light that enters your camera image sensor.
It works exactly like our eyes! Lets go back to the science chapter where we learnt that for our eyes to see clearly light needs to reach the retina through the pupil, which is the tiny black spot in the center of the iris. In this case, retina would be your ‘image sensor’ and the pupil would be the ‘lens-diaphragm-opening’
Whenever there is a bright light, we tend to shrink our eyes so that we don’t get blinded by it. Whenever there is less light, we tend to expand our eyes so that we can see better. In similar manner, we need to adjust the aperture on the lens opening to make sure we have just the right amount of light entering.
Aperture is measured in f/stops or f/number e.g. f/1.4, f/1.8, f/2 etc. There is a lot of math and calculation involved in why and how these numbers got created. Honestly speaking, it’s too much math for my tiny brain; hence I just follow this thumb rule.
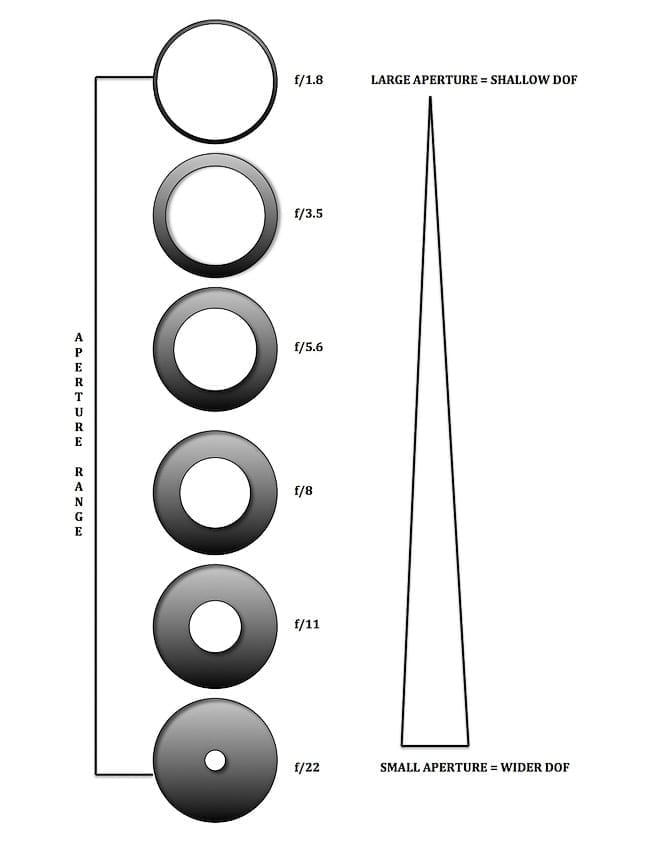
The bigger the lens diameter opening, the smaller the f/stop should be. So, if your f/stop is at 1.4 you will have maximum light entering the camera image sensor. While at f/22 you will have least amount of light entering the camera image sensor.
Aperture also helps creating a depth a field in your photo. Depth of field (DOF) means how much of area in your photo is in focus. It depends on the focusing distance.
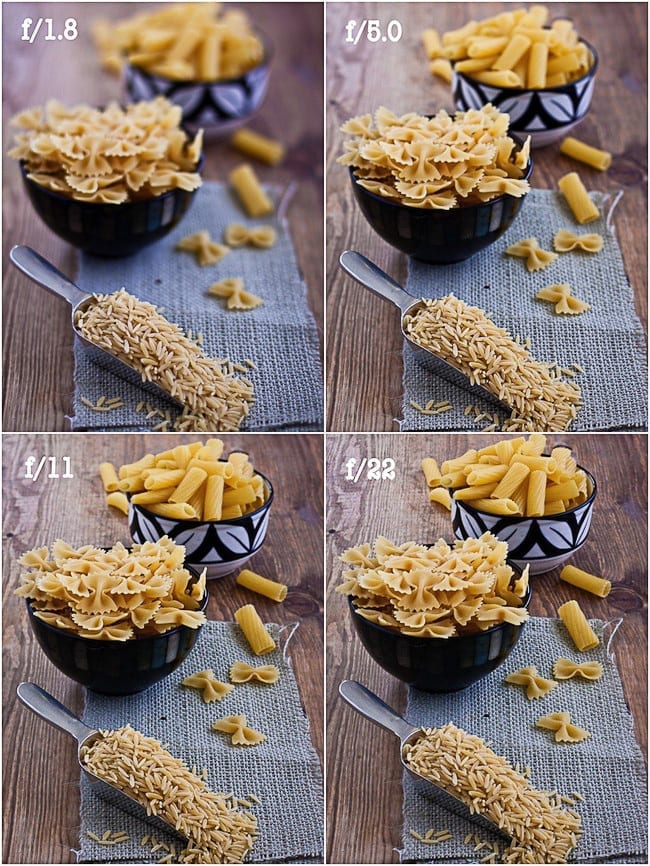
Larger or Wider DOF would mean that most of the area in an image is in focus and for doing that you have to click in higher f/stop number. Shallow or Narrow DOF means only certain part of the image is in focus creating a blurry or fuzzy background, which can be created by clicking in lower f/ stop number.
In the below example, notice the gradual transition as I increased the f /stop.
Shutter Speed
It is the amount of time the shutter stays open for the light to fall on the image sensor to create an image. Remember, inside your camera, it’s dark. It needs light to capture an image and light doesn’t automatically enter inside the camera. Once you set the f/stop and ISO, you have decided the amount of light and the sensitivity of the light. You have to now allow the light to travel to the image sensor by pressing the shutter button.
Shutter speed is measured in seconds or fraction of a second like 1/50, 1/60, 1/80 etc.
The higher the denominator number, the lesser time it gets for light to enter and hence creating a faster shutter speed. The lower the denominator, the more time the shutter stays open and more light enters in, thereby slowing the shutter speed.
Shutter speed is connected with the focal length of the lens. In daylight shooting, a 50mm lens would probably require a shutter speed of 1/60 and with a 200mm lens you would have to shoot at a 1/250-shutter speed. This is not a rule and it will differ depending on the ISO and f/stop. We will discuss how to balance these a little later.
When I am photographing still life, portrait, landscape I generally stay within a particular range of 1/ 60 sec to about 1/200 (approximately) and that is normal for any existing light situation.
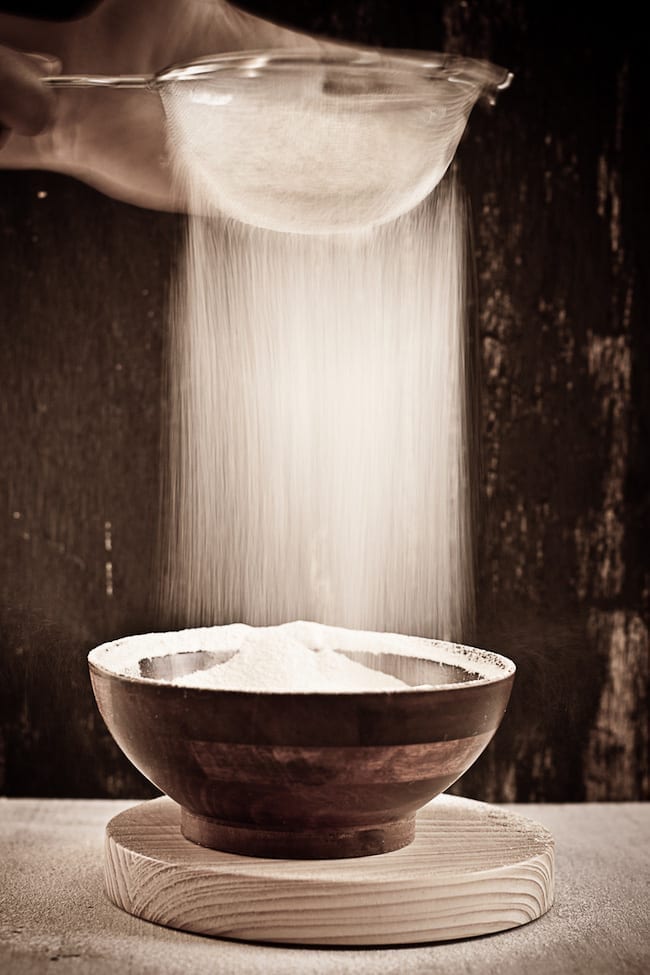
When there is low light, or when I want to photograph a motion, I slower the shutter speed allowing it enough time to capture the available light. During such situation a tripod is must or else the camera will shake creating a blurry image. Slower the shutter speed means lowering the denominator.
In the below example I used a lower shutter speed so that I could capture the movement.
Camera Setting { f/3.2, ISO: 100, ⅛ sec shutter speed}
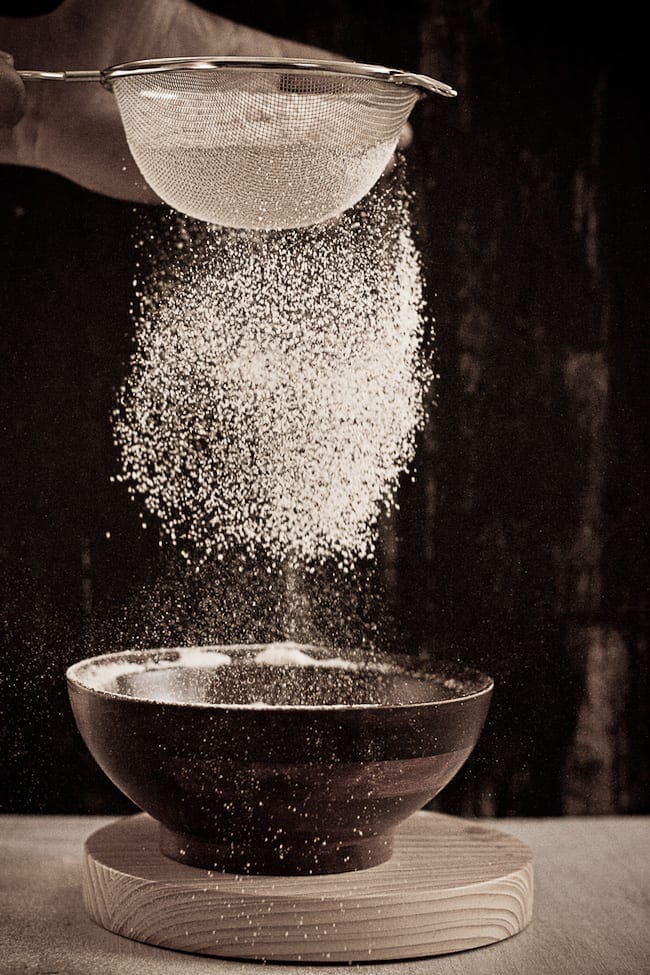
On the other hand, if you wish to freeze a motion, like photographing playing kids, or surfers on the ocean, you would need to use a faster shutter speed.
In the below example I tried capturing the flour falling on the bowl, trying to freeze the action unlike in the previous photo where I captured the motion
Camera Setting { f/2.8, ISO: 3200 at 1/1000 sec shutter speed}
Balancing the three elements: In case you dozed off in between, let’s do a quick recap!
- Image sensor is the object inside your camera that creates a picture and the sensitivity of the light that falls on the image sensor is determined by ISO.
- The lens opening that allows the light to fall on the image sensor is called aperture and is measured in f/stop.
- And finally, shutter speed determines how long the image sensor should be exposed to light before it ‘clicks’ the image.
Finding the balance is important to get the exposure you are looking for. Let us look at it through some examples.
This is the set up I used and that’s where I take all my photos. It’s a tiny area next to my kitchen but I love the space because of the two well-lit windows. This way, I get both side light and back light.
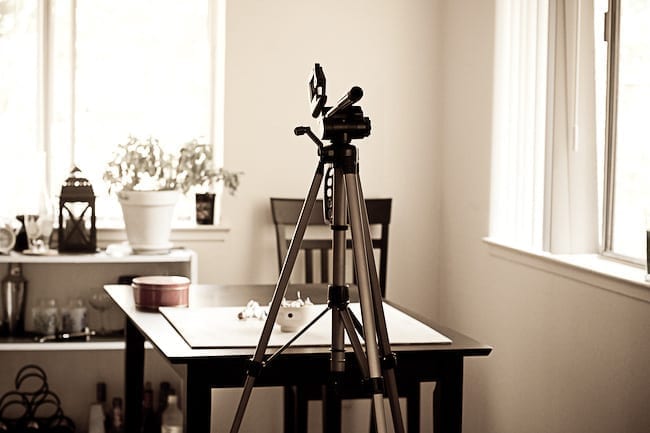
Example 1: Grapes
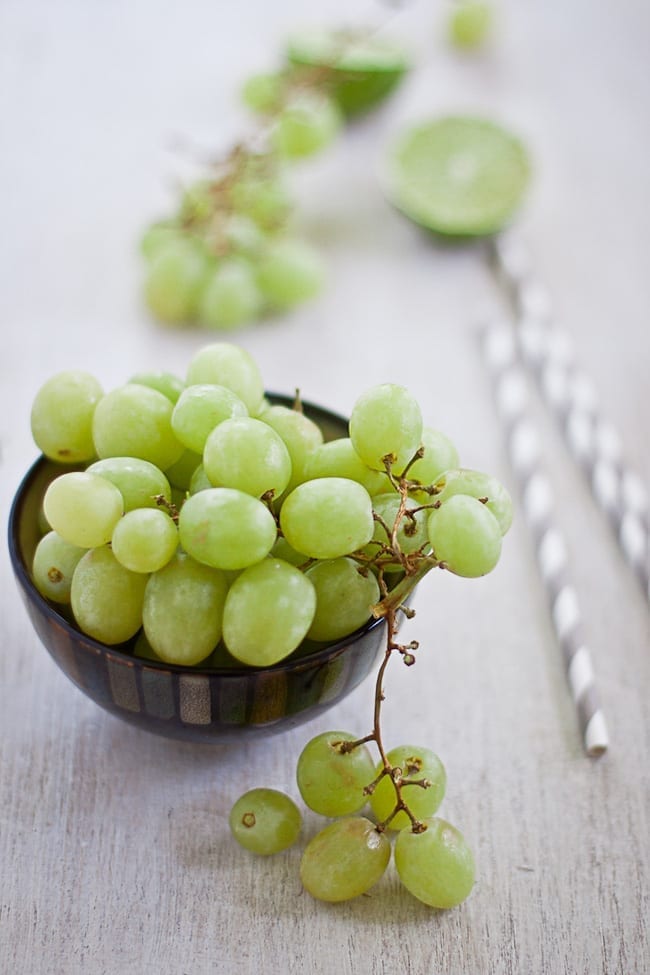
It was a sunny day. I pinned a thin white cloth on both the window blinds thereby diffusing the light. I started with ISO 200. My plan was to focus on the grapes and have a blurry background. So, I set the f/stop at f/1.8 and then, I started to look at the viewfinder of the camera to see how the exposure and light looks. The shutter speed was at 1/50sec, which made it too bright and so. I increased the shutter speed to 1/60sec and it gave me the lighting, the exposure and the depth that I wanted.
Camera Setting {f/1.8, ISO: 200 at 1/60 sec shutter speed}
Example 2: Corn
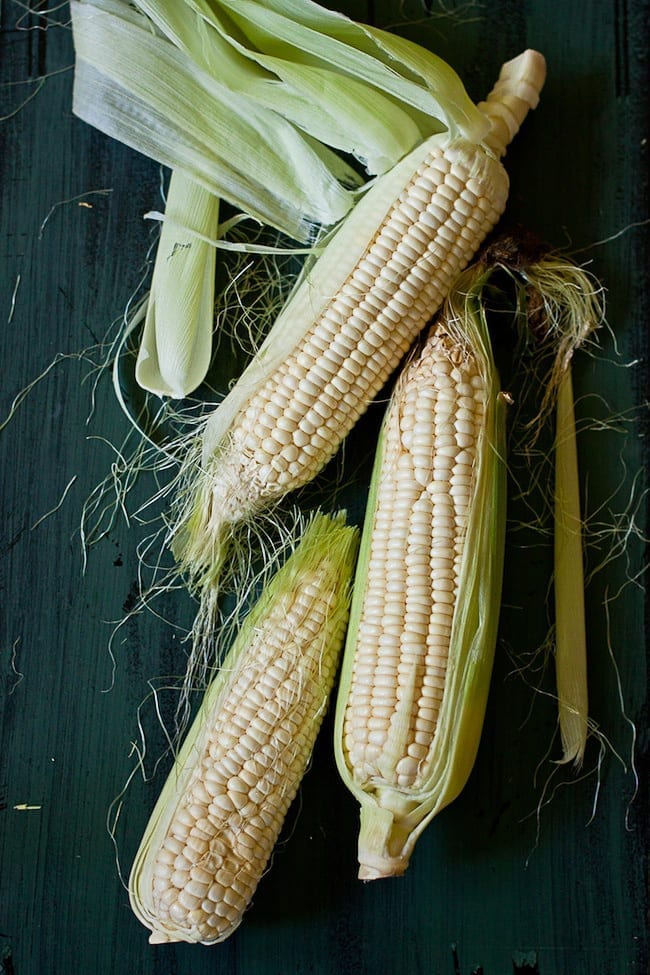
I wanted an over the top shot and so I removed the table and kept the board on the floor next to the window. I started with f/2.8 because I wanted most of the corn to be visible. As I changed the lens diameter from 1.8 (in previous shot) to 2.8, it automatically reduced the amount of light that could enter the image sensor. It looked little dark and so, I increased the ISO to 400. After looking through the viewfinder of the camera, it still looked underexposed and hence I lowered the shutter speed to 1/50 sec and I was happy.
I didn't use any reflector and that created a nice shadow on the right side of the frame.
camera setting {f/2.8, ISO: 400 at 1/50 sec shutter speed}
Example 3: Splashing Water
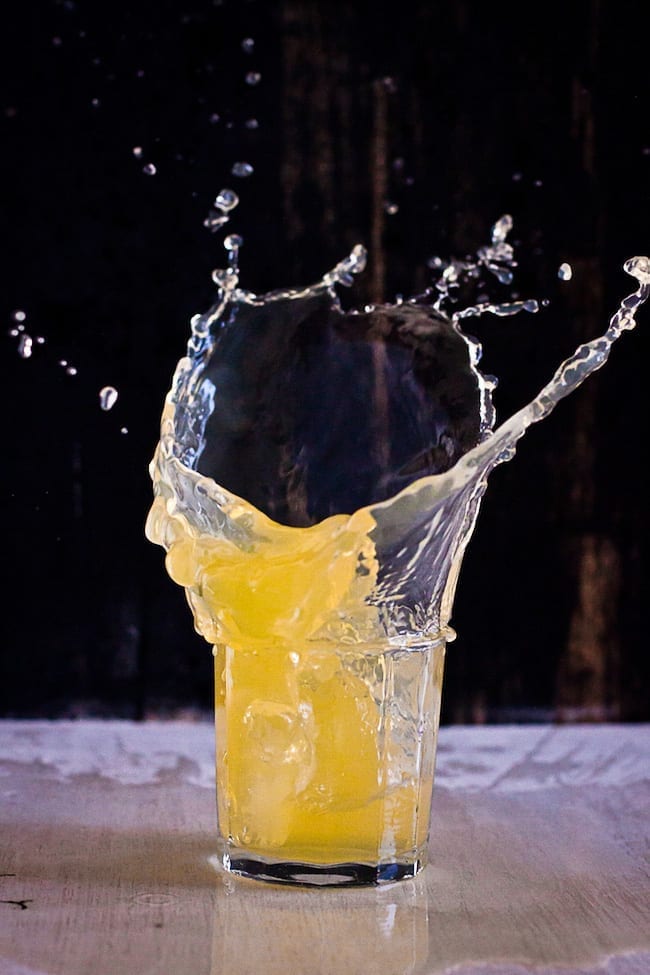
This was a tough and messy shot! I wanted to freeze the motion and like I said before, in order to do that we would need to click at a much faster shutter speed. I used only sidelight in this case. Since I knew I was going to use a fast shutter speed, I had to increase the ISO so that enough light goes in at the quickest amount of time. Finally, I photographed it at ISO 3200, f/ 3.2 at 1/1000 sec. I am still experimenting with these kinds of shots, trying out different setting but for now, I am satisfied with this.
Camera Setting {f/3.2 , ISO: 3200 at 1/1000sec shutter speed}
Here is a very interesting diagram on Exposure Triangle that I found in Flickr. It is very useful to understand the balance.
It will not be easy to remember all these terms if you are reading it for the first time. You will have to read it again and again. Eead more articles on the internet, see youtube videos and then slowly you'll get used to the concept. You have to practice and practice a lot! Hope this was useful and if you have any questions, you know how to contact me!
Next up: We will talk about white balance, metering and more on camera settings.


shema george
This is such an informative post...sharing knowledge is such a good deed ..u are awesome !!!
I have always admired your photos...
Thanks again
ray
This a wonderful and very helpful post! You are really an amazing photographer. Thank you very much, Kankana! 🙂
Abi
Hi, your explanation is very simple & detail. you've succeeded in the water splashing photo. I absolutely love it. Also I hv tried with Ison 400 before, however photos have resulted with noise. How to get clear photos? Your simple explanation encourages me to try to shoot in manual mode. Also in your next post I would like u to explain the histogram. tnx
Kankana Saxena
Thank you Abi! I am not sure why you getting noise when clicked in ISO 400. May be, you could email me (kankana-at-playfulcooking-dot-com) a photo mentioning the Exif data and we can discuss from there. As for histogram, yes I do want to cover it but not planning for the next post. There are few other settings required to be understood before we move to histogram 🙂
Spandana
Very useful post, just like the previous one. Loved all the pics, esp the flour and the juice pics.
Jacqueline
A well written and informative post Kankana. It is so clear you know this subject inside and out. Thanks for being generous enough to share your photography knowledge 🙂
Sanjeeta kk
Another treasure to my food photography tips folder! Amazing clicks, appreciate o all the handwork gone into making these blog posts, Kankana.
IshitaUnblogged
Kankana, thank you again and again for these helpful posts. Definitely bookmarking this one - read more than once and as you have said that one needs to keep on reading. One thing, your posts are very helpful, written in easy words for a layman like me.
The flour shots - stunning!
Sharing:)
Shabs
Thank you so much Kankana , that was really helpful . I am always ogling your photographs .
nags
i am sure a lot of people are going to find this super useful. the amount of work that's gone into it totally shows 🙂
Pia
What a superbly explained article, kankana! This obviously took a LOT of planning! Well done, you 🙂
Maureen
I'm in awe of your talent. I've always left my ISO on automatic as that's what my last instructor advised us to do. I'm going to have a play with it tomorrow. 🙂 Thanks heaps.
athena
excellent post... wish I would've had you help me when I started years ago. I'm sure there are many out there who appreciate this and are benefitting immensely from your knowledge 🙂
indugetscooking
Hi....Thanks for such a very informative post.
In the grapes shot, where do you keep the focus, on the side of the image or the centre? I am not sure if focus is the right term, what I mean is the small rectangle on the viewinder that goes green when focus is achieved. Does the placement of this rectangle determine which part of the pic is in focus, while aperture determines how much is in focus?
Indu
Kankana Saxena
Hi Indu, this is very good question and I was about to cover it in the next post of the series 🙂 Now that rectangle you mentioned, yes that needs to placed in the area where you wish to focus and that rectangle can be moved around. So, I moved slightly at the center bottom so that I could focus on the stems along with grapes around it. And you are right.. that rectangle determines where you want to focus and aperture determines how wide or narrow you wish to focus. If you see the photos of the pastas on top .. you will see how the depth or focus changes and gets wider as I keep increasing the f/stop. Hope this helps 🙂
indugetscooking
Thanks Kankana...Looking forward to the next one....
Ananda Rajashekar
Babes, i couldn't stop myself stopping here, very informative post! Thanks for sorting it the way we could absorb it easily and put them action. Loved the fstop, with the images ( i have never come across this kind of post anywhere). You are a shining star! I miss seeing you gorgeous pictures 🙂
Kankana Saxena
Babes .. so happy to see you here 🙂 Thank you so much and I am so glad you liked it! And you should know I am missing your gorgeous pictures too.
Kiran Narayan
Excellent photographs! And a highly commendable effort to explain the concept. Kudos on that!... just a point, you might want to have a post discussing the relative science between ISO and f-stop, to better discuss the effect of low light on photography. Because if shot in yellow light, some of your tips might be perceived otherwise, because people who follow it would not be applying it right. Also, one other key is to talk about effect of White balance on a photo.
Excellent photos!! Loved your photo idea on ISO and shutter speed concepts.
Kankana Saxena
Thank you Kiran for dropping by and leaving your notes. I plan to discuss about all these in next post. I didn't wanted to cover everything in one post. Plus, I had mentioned in the first post of the series that I would be talking mostly and mainly about day light photography. Having said that, I agree with your point and will try to cover how to shoot in yellow light in the next post of the series. Thanks once again 🙂
Color and Spices
What a wonderful explanation, you made it so easy, thanks a lot.
Shumaila
Kankana what a beautifully illustrated informative post.
Sonia
I would just say a BIG Thank You for everything! 🙂
Usha
Awesome post, Kankana! You explained the three most important elements of photography very well. I like your photographs. I also tried the splash in my apartment and yeah, it was a messy job! My splash is not as beautiful as yours but I was thrilled I captured something. I think even I used ISO 3200 & do nOt remember the shutter speed. It was a a very big number. Looking forward to your next post on photography.
Kankana Saxena
Hi Usha, Thank you so much for dropping by 🙂 I am so glad you tried! Did you try in continuous clicks ? Cause it cannot be captured in single shot .. too tough!
usha
I set the camera to shoot continuously but it did not work. So I had to do it in single shot. It was a little challenging to capture it in a single shot. Later that night, I learned something new about my new camera. Unlike in my old one, in the new camera I have to press & hold the shutter release button for few seconds for the camera to shoot continuously. I learned something new about my camera that day 🙂 I was meaning to try it again but the mess & cleanup after the photo shoot is daunting and stopping me from trying it again. 🙂
Laura (Tutti Dolci)
Such a great resource, I'm so glad you posted this. Your photos are gorgeous and I'm bookmarking this for future reference!