

Shakarpara, also known as shakkar para or shankarpali, is a traditional Indian sweet snack made with flour, ghee, and sugar. These little diamond-shaped bites are crisp on the outside, delicately flaky inside, and coated with a beautiful layer of crystallized sugar. They are especially popular during Diwali, but honestly, a jar of homemade shakarpara is wonderful to have around any time of the year.

My version of shakarpara is a little different from the recipes where sugar is mixed directly into the dough. I prefer to make a simple dough with flour and ghee, fold it gently to create flaky layers, fry the little diamond-shaped pieces until golden, and then toss them in a sugar syrup until the sugar crystallizes around each piece.
The result is a sweet, crunchy snack with a lovely layered texture and just the right amount of sweetness. It pairs beautifully with a cup of Indian chai and makes a lovely addition to your homemade Diwali faral platter or festive gift boxes.
If you have always wanted to make shakarpara at home, this recipe walks you through the entire process, including how to prepare the dough, cut the perfect little diamonds, fry them evenly, and get that classic sugary coating.
What Is Shakarpara?
Shakarpara is a traditional Indian sweet snack made from a simple flour-based dough that is cut into small pieces and fried until crisp. Depending on the region and the recipe, the sweetness can come from sugar mixed into the dough or from a coating of sugar syrup added after frying.
It is particularly popular during festive occasions such as Diwali and Holi, when families prepare batches of homemade snacks to share with friends and relatives.
Shakarpara is known by several names, including shakkar para, shankarpali, and sweet para. Shankarpali is especially associated with Maharashtrian festive cooking, while shakkar para is widely enjoyed across different parts of India. Recipes and textures vary from household to household.
Some versions are firm and crunchy, while others have a delicate, shortbread-like texture. My version focuses on flaky layers and a lightly crisp exterior, finished with a coating of crystallized sugar.It fun to munch around and even though coated with sugar, it is not overly sweet.

Why You Will Love This Recipe
Simple pantry ingredients: You only need flour, ghee, salt, sugar, water, and oil for frying.
Beautiful flaky layers: Gently folding the dough instead of kneading it helps create a delicate, layered texture.
A lovely sugary coating: The sugar syrup crystallizes around the fried pieces, giving them their signature sweet finish.
Perfect for Diwali: Make a batch for your festive snack platter or package it in small jars as edible gifts.
Great with chai: These little sweet bites are wonderful alongside your afternoon tea or coffee.
Make-ahead friendly: Once completely cooled and stored properly, shakarpara keeps well for enjoying over several days or weeks, depending on the conditions.
Ingredients for Homemade Shakarpara
You do not need a long list of ingredients to make delicious homemade shakarpara. The secret lies in the proportions, the way you handle the dough, and the temperature of the oil.
All-purpose flour
All-purpose flour, also known as maida, forms the base of this recipe. It creates a dough that is easy to roll and cut while helping the finished shakarpara develop a crisp, delicate texture.
You can experiment with whole wheat flour or a combination of whole wheat and all-purpose flour, but the texture will be different. Whole wheat flour generally produces a slightly denser, more rustic bite.
Ghee
Ghee is one of the most important ingredients in this recipe. It adds a rich aroma and helps create the crumbly, flaky texture that makes these sweet bites so delicious.
When you rub the ghee into the flour, the mixture should resemble coarse crumbs and hold together when squeezed in your palm. This step is often called incorporating the fat or adding moyan to the dough.
Using too little ghee can make the finished shakarpara harder, while too much can make the dough greasy and difficult to handle.
Salt
A small pinch of salt balances the sweetness and brings out the flavor of the ghee. You will not taste a salty snack, but the overall flavor will be more rounded.
Granulated sugar
Granulated white sugar is used to prepare the syrup that coats the fried shakarpara. As the syrup cooks and then crystallizes around the pieces, it forms a delicate, sweet coating.
I prefer coating the shakarpara after frying because it gives each piece a distinct sugary crunch.
Water
Water helps bring the flour and ghee mixture together into a workable dough. Add it gradually rather than pouring it all in at once. The amount needed can vary slightly depending on your flour and how the dough comes together.
Oil for deep-frying
Use a neutral oil suitable for deep-frying, such as canola, sunflower, or vegetable oil. You can also use another oil that is appropriate for deep-frying and has a flavor you enjoy.
The oil temperature matters more than the particular neutral oil you choose. Shakarpara needs enough time to cook through before it develops a deep golden color.

How to Make Shakarpara Step by Step
This recipe has three main stages: preparing the dough, frying the pieces, and coating them with sugar syrup.
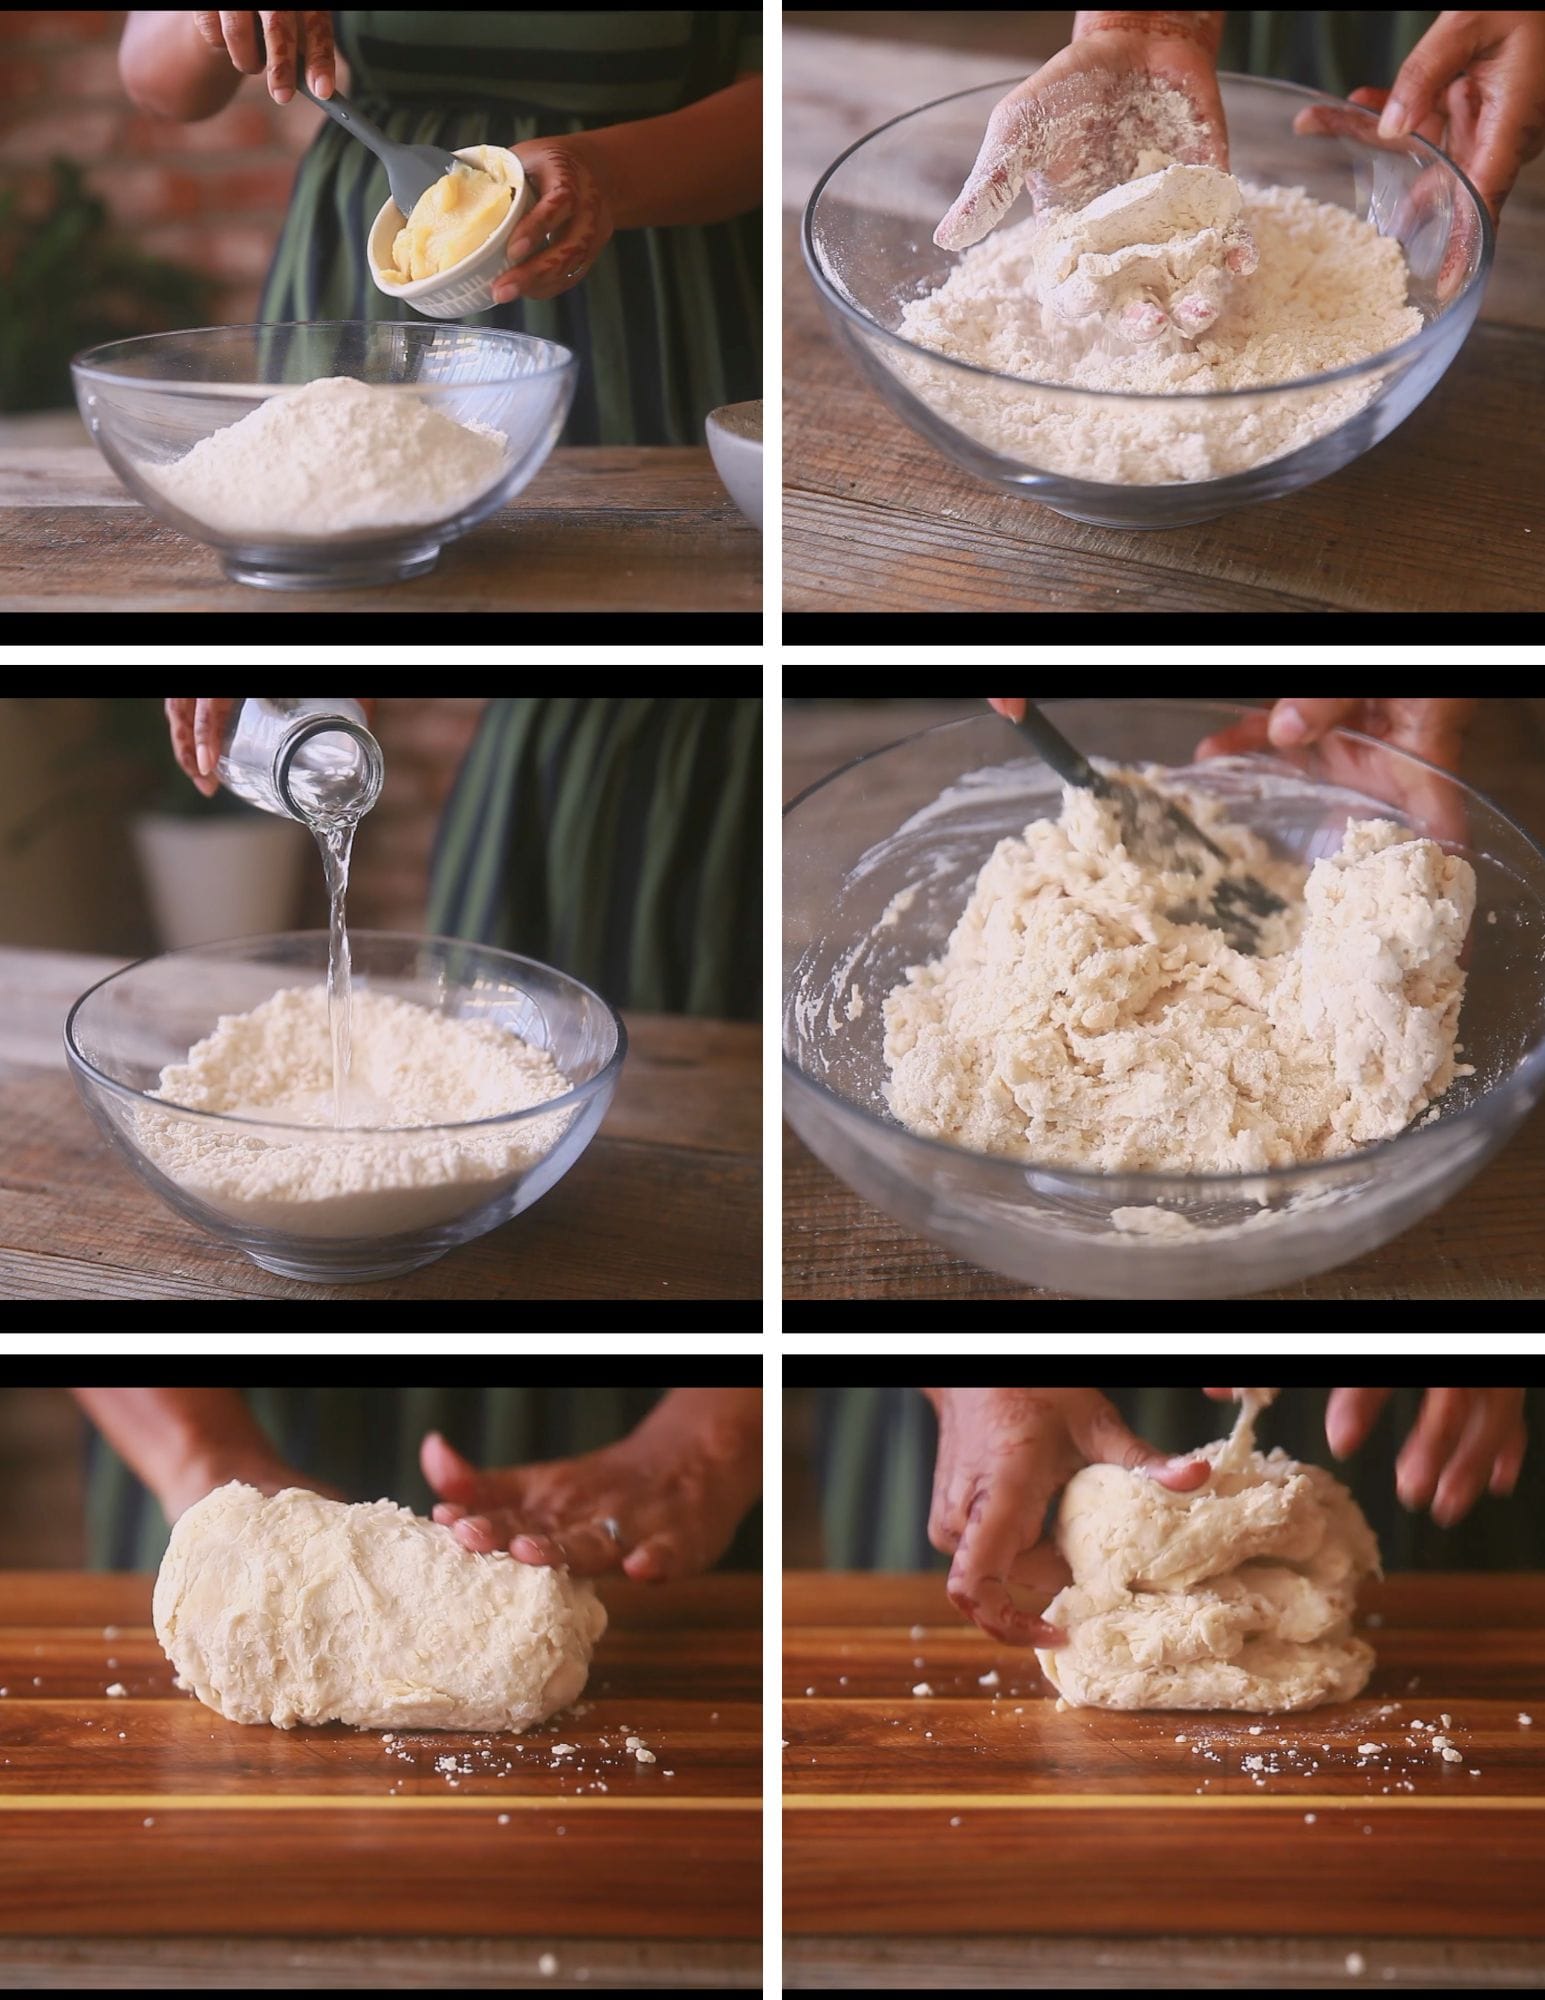
Step 1: Prepare the flour and ghee mixture
Add the all-purpose flour, a pinch of salt, and ghee to a large mixing bowl.
Using your fingertips or a spatula, rub the ghee into the flour until the mixture looks crumbly. When you press a little of the mixture between your fingers, it should hold its shape.
This is an important step because the fat coats the flour and contributes to the short, flaky texture of the finished snack.
Step 2: Bring the dough together
Gradually add water and mix with a rubber spatula until the flour mixture begins to come together.
You are looking for a firm, manageable dough, not a soft or sticky one. Start with less water and add a little more only if needed.
Transfer the dough to a clean work surface and gently fold it over itself several times for about two minutes. Do not knead it as you would bread dough.
The goal is to bring everything together and develop layers, rather than make the dough smooth and elastic through extensive kneading.
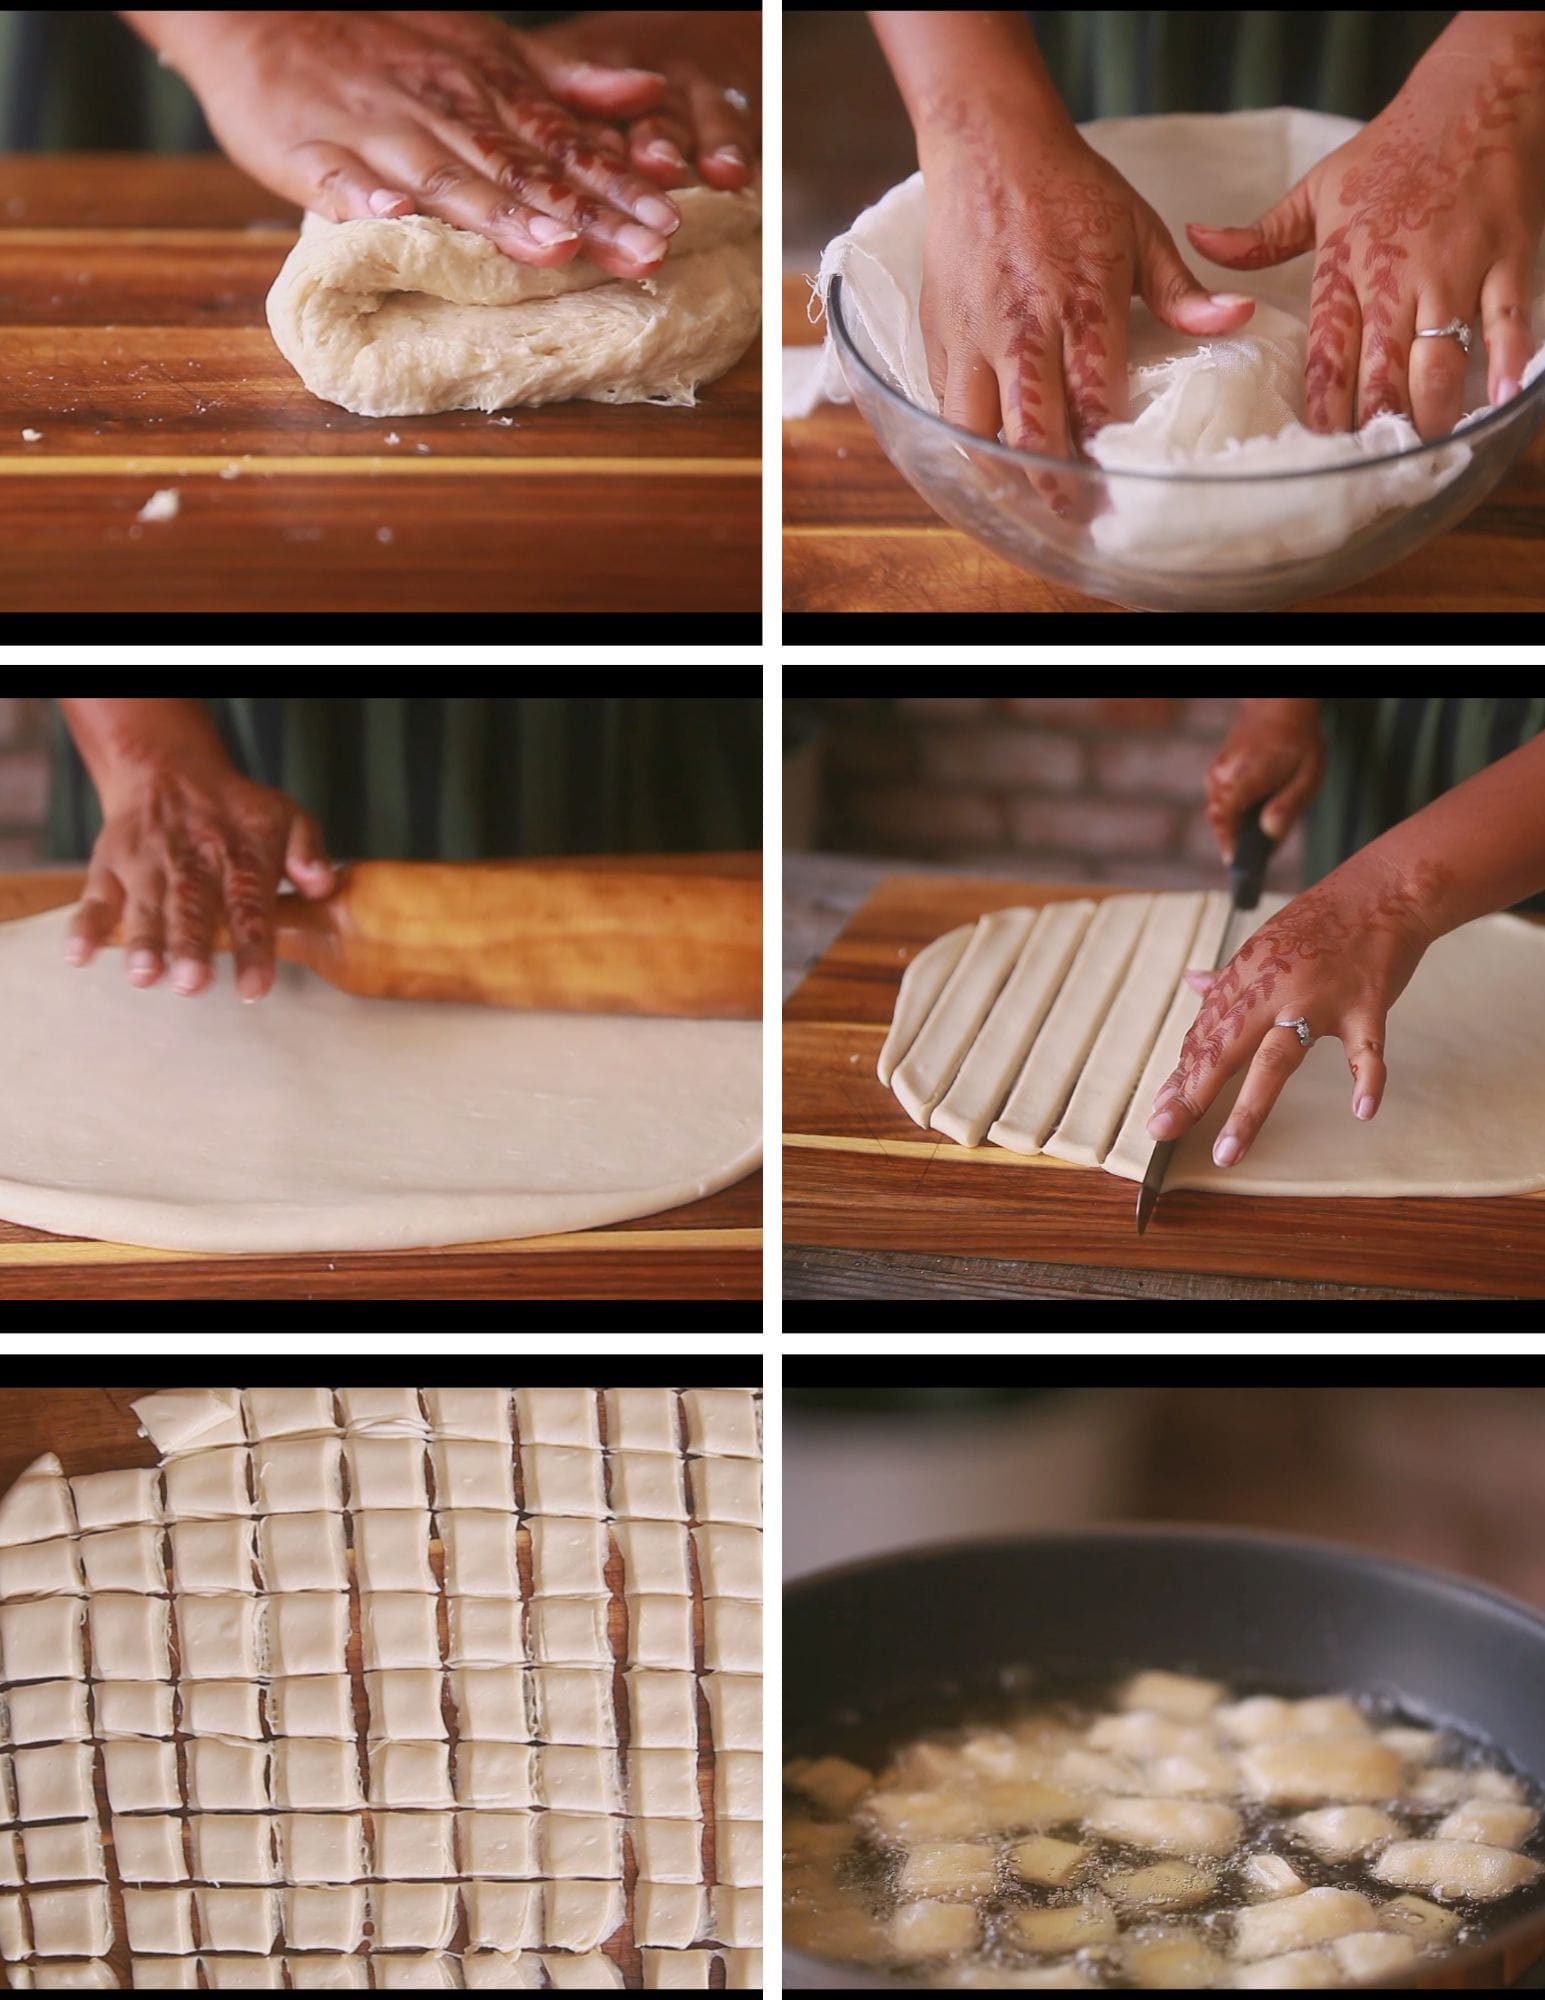
Step 3: Rest the dough
Shape the dough into a ball and return it to the mixing bowl. Rub a little ghee over the surface and cover the bowl.
Let the dough rest for about 30 minutes.
Resting gives the dough time to relax, making it easier to roll without excessive shrinking or resistance. It also makes the next steps more manageable.
Step 4: Roll out the dough
Place the rested dough on a clean work surface and roll it into an even sheet.
Aim for approximately 1 cm thickness, as in my original method. Keep the thickness as uniform as possible so the pieces cook evenly.
If the dough is too thick, the outside may brown before the middle cooks through. If it is too thin, the shakarpara can become harder and may brown too quickly.
Step 5: Cut into small diamonds or square
Use a sharp knife or pizza cutter to slice the rolled dough into strips. Cut across the strips at an angle to create small diamond shapes. You can also make squares or rectangles if you prefer.
Try to keep the pieces similar in size. Uniform pieces are easier to fry evenly, and the finished batch will look lovely when served in a bowl or packed into gift jars.
Separate the cut pieces gently so they do not stick together.
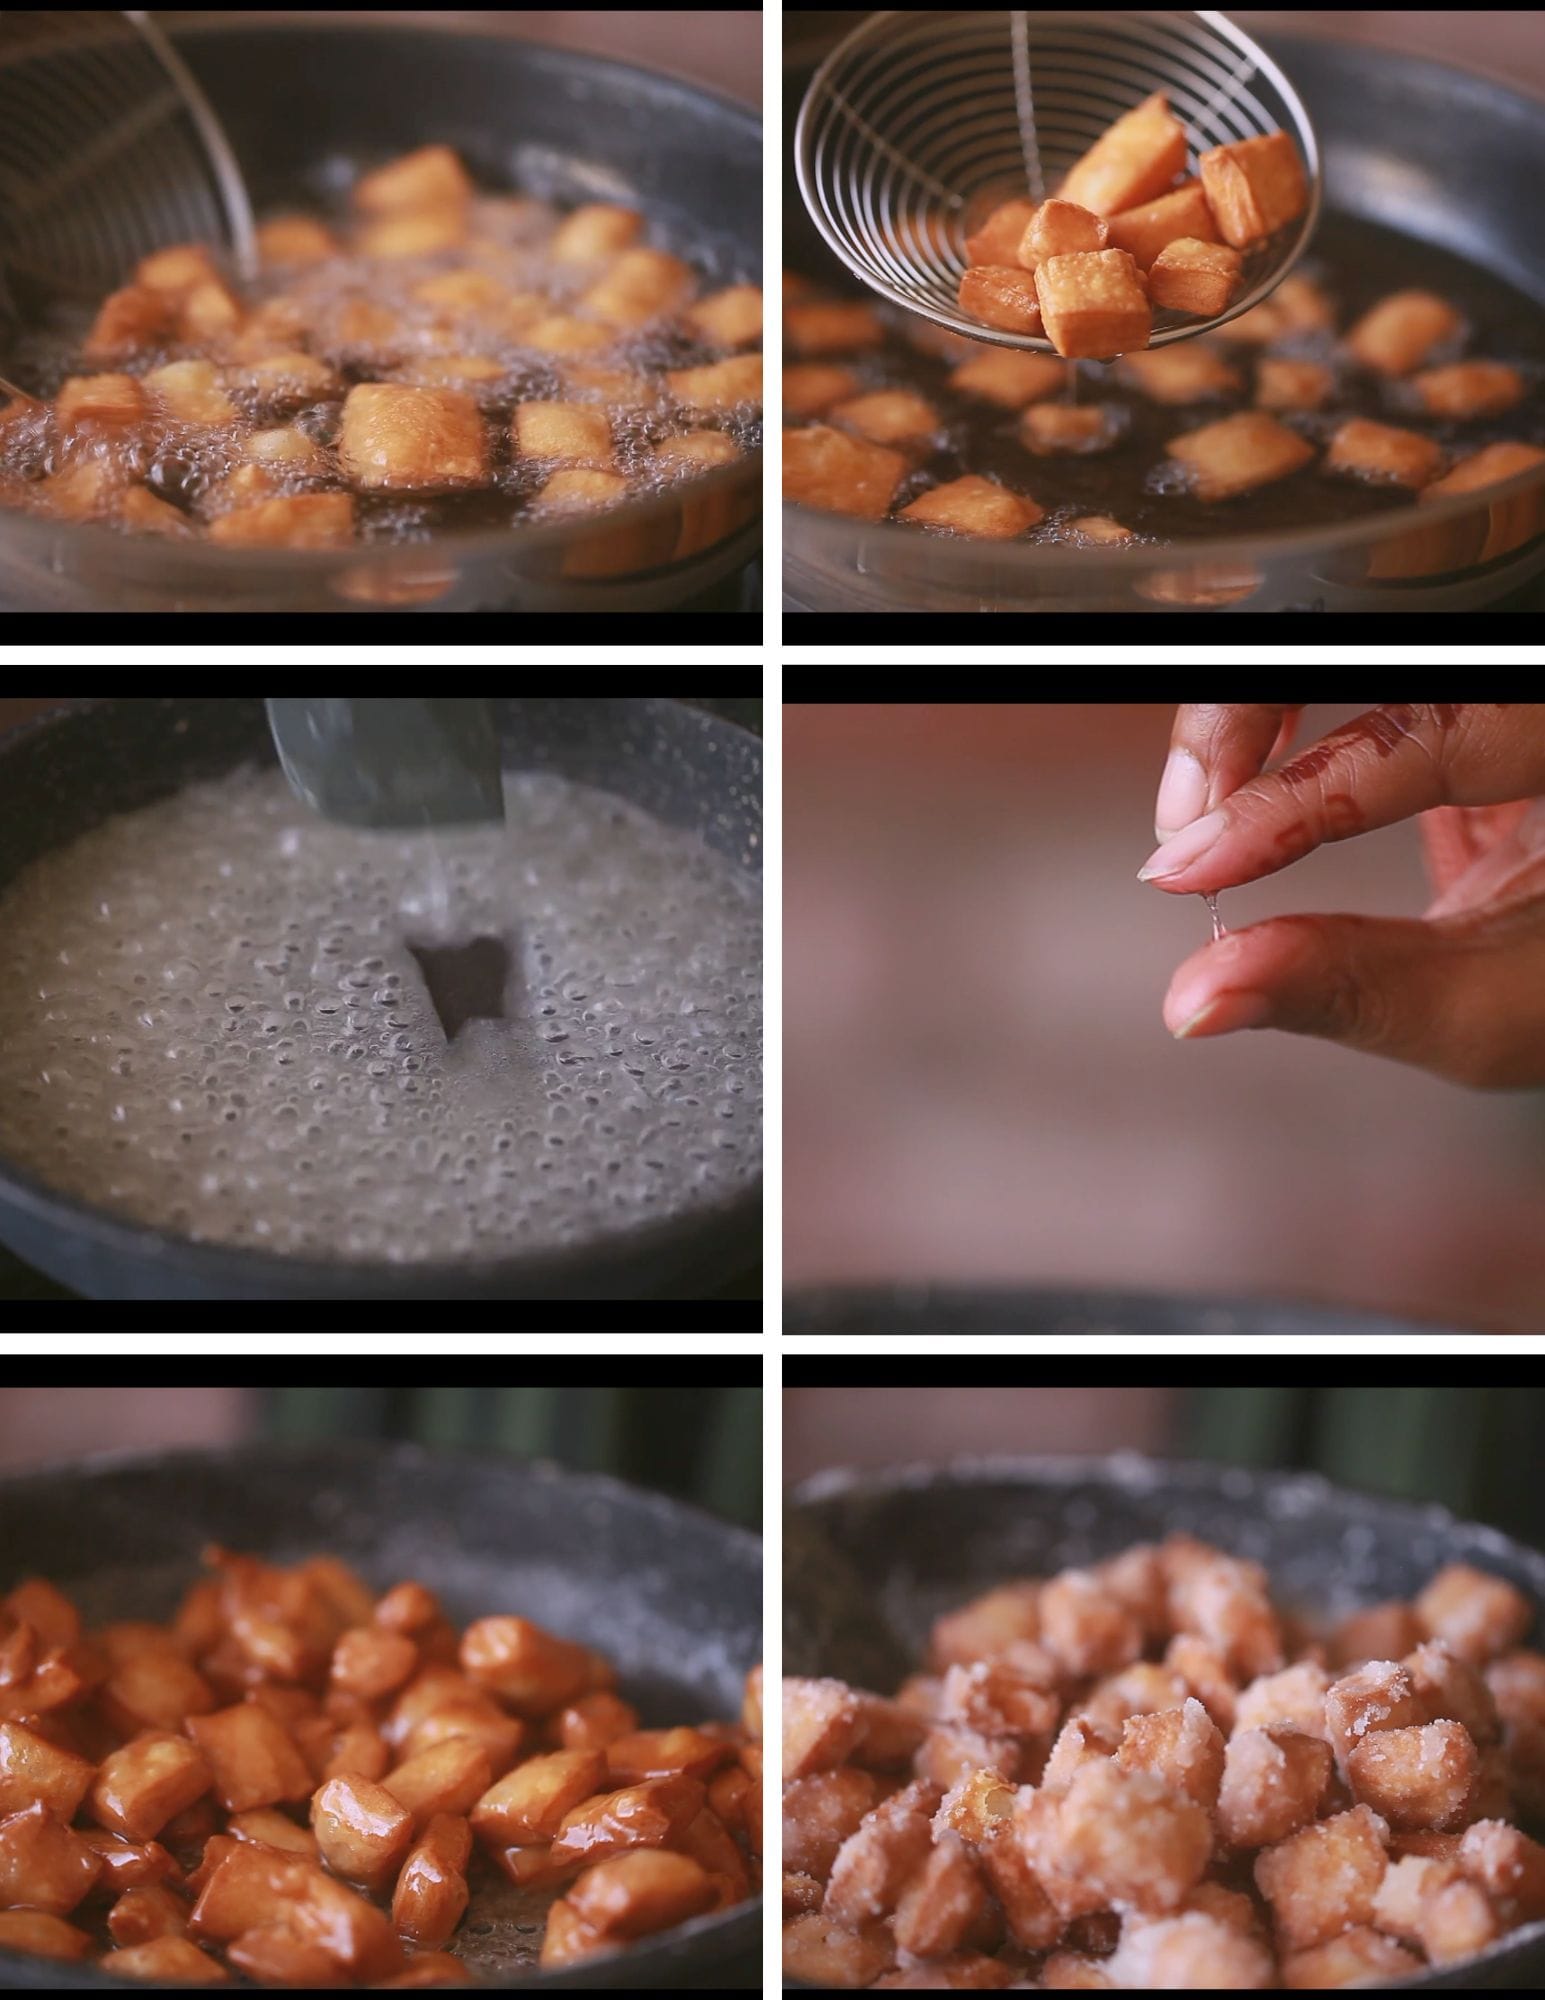
Step 6: Fry the shakarpara slowly
Heat enough oil in a deep, heavy-bottomed pan to submerge the pieces comfortably.
Begin with the oil at medium-low heat. Add a small batch of cut dough, leaving enough room for the pieces to move around without overcrowding the pan.
Fry for approximately five minutes over medium-low heat, allowing the pieces to cook through gradually.
Then increase the heat to medium-high and continue frying for approximately five more minutes, or until the shakarpara turn golden and crisp.
These times are a guide rather than a fixed rule. The actual cooking time will depend on the thickness of your dough, the size of the pieces, the quantity in the pan, and the oil temperature.
If the pieces brown too quickly, reduce the heat. If they remain pale and soft, allow them more time to cook.
Remove the fried shakarpara with a slotted spoon and let the excess oil drain.
Repeat with the remaining pieces, allowing the oil temperature to stabilize between batches.
Step 7: Prepare the sugar syrup
Add the granulated sugar and water to a separate pan.
Heat over medium heat, stirring initially to help the sugar dissolve. Allow the syrup to cook until it reaches a one-string consistency.
To check the consistency, take a tiny amount of cooled syrup between your thumb and index finger and gently pull your fingers apart. A thin thread should form between them.
Be extremely careful when handling hot sugar syrup because it can cause serious burns. Let a small sample cool enough to handle before checking it, and never touch boiling syrup directly.
The consistency of the syrup is important. If it is too thin, the sugar coating may remain sticky. If it is cooked too far, the sugar may harden before it coats the shakarpara evenly.
Step 8: Coat the fried shakarpara
Add the fried shakarpara to the syrup and toss continuously with a spatula.
Keep moving the pieces around so the syrup coats them evenly. As you continue tossing, the sugar will begin to crystallize and form a delicate white coating around the golden pieces.
This usually takes a few minutes. Keep the heat controlled and remove the pan from the heat if the sugar begins to crystallize too quickly or form large clumps.
Continue tossing until the pieces are coated and mostly separated from one another.
Step 9: Cool completely before storing
Spread the sugar-coated shakarpara on a large plate or tray, separating any pieces that are stuck together while the coating is still easy to handle.
Let them cool completely before transferring them to an airtight container.
The coating will firm up as the shakarpara cool, giving you that lovely combination of a crisp bite, flaky layers, and a sugary exterior.
Serve with hot chai, or save them for your Diwali snack platter.
My Secret to Flaky, Layered Shakarpara
The technique that makes this recipe different is the way I handle the dough.
Many recipes ask you to knead the dough until smooth. For my version, I prefer to mix it just enough to bring everything together and then fold it several times.
Here is why I like this method.
First, rub the ghee into the flour properly. The mixture should look crumbly and hold together when squeezed. This creates the foundation for a tender, flaky bite.
Second, avoid extensive kneading. Kneading develops gluten, which can make the texture firmer and more elastic than I want for this recipe.
Third, fold the dough gently. Folding creates layers without working the dough excessively. When the finished shakarpara is broken in half, you should be able to see a delicate, layered interior.
Finally, allow the dough to rest. This makes rolling easier and helps the dough relax before you cut it into shapes.
These small details make a noticeable difference in the final texture.

Why You Should Not Fry Shakarpara in Very Hot Oil
Frying temperature is one of the most important factors when making shakarpara.
If you add the pieces to very hot oil, the outside can turn golden brown before the center has had enough time to cook. The result may look ready but feel hard or insufficiently crisp after cooling.
I prefer a slower, two-stage frying method.
Start at medium-low heat so the pieces have time to cook through. Once they are nearly cooked, increase the heat to help them develop their golden color and crisp exterior.
If you have a kitchen thermometer, you can use it to monitor the oil temperature. For a more controlled approach, start around 300°F to 320°F and adjust the heat as needed, avoiding rapid browning.
Do not overcrowd the pan. Adding too many pieces at once can cause the oil temperature to drop, leading to uneven cooking and a greasy result.
Remember that shakarpara continues to firm up as it cools. Do not wait for every piece to become extremely hard in the oil.
Can You Bake Shakarpara Instead of Frying?
Yes, you can bake shakarpara if you prefer not to deep-fry them.
Arrange the cut dough pieces on a lined baking sheet, leaving a little space between them. Bake at 350°F for approximately 20 minutes, checking regularly and adjusting the time according to the size and thickness of the pieces.
The pieces should be cooked through and lightly golden. Allow them to cool before assessing the texture, as they will firm up as they cool.
For the sugar coating, prepare the syrup separately and toss the baked pieces in it using the same method described above.
Keep in mind that the baked version will have a different texture from the fried version. My preference is the fried version because it produces the flaky, crisp texture I associate with traditional homemade shakarpara.
Common Shakarpara Mistakes and How to Avoid Them
1. Shakarpara turns hard instead of flaky
This can happen when the dough is kneaded too much, the flour-to-ghee ratio is not right, or the pieces are rolled too thin.
Mix the dough just enough to bring it together, fold gently, and keep the thickness consistent.
2. Shakarpara looks golden but is not crisp inside
The oil may be too hot, causing the outside to brown before the middle cooks.
Use medium-low heat at the beginning and allow the pieces to cook gradually before increasing the heat.
3. Shakarpara absorbs too much oil
Oil that is not hot enough can cause the pieces to absorb more oil, particularly if the pan is overcrowded.
Fry in small batches and allow the oil to return to the appropriate temperature before adding the next batch.
4. The sugar coating stays sticky
The syrup may not have reached the correct consistency, or the shakarpara may have been stored before cooling completely.
Cook the syrup to the appropriate one-string consistency and let the coated pieces cool thoroughly in a single layer before storing.
Humidity can also affect the sugar coating, so keep the container tightly sealed.
5. The sugar forms large clumps
If the syrup crystallizes too quickly, the pieces may stick together instead of receiving an even coating.
Toss continuously and separate the pieces as soon as the coating begins to set. Avoid cooking the syrup much longer than necessary.
6. The pieces cook unevenly
Uneven thickness and different-sized pieces can lead to inconsistent results.
Roll the dough evenly, cut the pieces to a similar size, and fry in small batches.
Variations You Can Try
Once you are comfortable with this basic shakarpara recipe, there are several ways to experiment.
Whole Wheat Shakarpara
Replace some or all of the all-purpose flour with whole wheat flour. The result will be slightly denser, with a more pronounced wheat flavor. You may need to adjust the water gradually to achieve a workable dough.
Cardamom Shakarpara
Add a little ground cardamom to the sugar syrup for a warm, aromatic flavor that works beautifully with chai.
Jaggery Shakarpara
For a different traditional flavor, experiment with jaggery instead of granulated sugar. Jaggery has a deeper, caramel-like taste, but the coating will behave differently and may remain less crisp depending on the recipe and humidity.
How to Store Homemade Shakarpara
Shakarpara is an excellent make-ahead snack, especially during the busy festive season.
Allow the pieces to cool completely before transferring them to a clean, dry, airtight container. Store the container in a cool, dry place away from direct sunlight and moisture.
When prepared and stored properly, shakarpara can keep well for several days or longer. For the best texture, always check that the pieces are fully cooled and dry before sealing the container.
Avoid storing warm shakarpara in a closed jar. Trapped steam can soften the pieces and make the sugar coating sticky.
If you live in a humid environment, take extra care to keep the container sealed between servings.
How to Serve Shakarpara
My favorite way to enjoy shakarpara is with a cup of hot Indian chai. The crisp, sweet bites are a lovely contrast to the warm, slightly spiced tea.
They also make a wonderful addition to a Diwali faral platter alongside other homemade festive snacks and sweets.
Here are a few ways to serve them:
- With masala chai or ginger tea for an afternoon snack.
- As part of a Diwali snack platter with savory nimki and other festive treats.
- In small jars or food-safe gift bags as homemade edible gifts.
- As a sweet snack to keep on hand when you want something crunchy.
Because they are easy to portion and share, shakarpara is also a practical addition to a festive dessert table.
Frequently Asked Questions
The names are often used for similar Indian sweet snacks made from a flour-based dough. Shankarpali is especially associated with Maharashtra, while shakkar para is a widely used name across several regions. Recipes differ in their dough, sweetness, shape, and finishing method.
The texture depends on the amount of ghee, how well it is incorporated into the flour, how much the dough is worked, and how the pieces are fried. Rub the ghee into the flour until crumbly, fold the dough gently instead of kneading extensively, and maintain an even thickness
Yes. Shakarpara is a great make-ahead snack for festivals and parties. Once the pieces have cooled completely, store them in a clean, airtight container in a cool, dry place.
Why isIt may have been rolled too thin, worked too much, or fried at an unsuitable temperature. Make sure the dough is not overworked, keep the pieces evenly thick, and allow them to cook gradually. my shakarpara hard after frying?
The syrup may be too thin, or the coating process may not have been completed correctly. Cook it to a one-string consistency, then toss the fried shakarpara continuously until the sugar begins to crystallize.
It depends on the recipe. Some versions incorporate sugar directly into the dough, while this version uses a sugar syrup coating after frying. That creates a sweet, crystallized exterior while keeping the inside more delicately flavored.

More Indian Snacks to Try

Shakarpara - Mishti Nimki

Ingredients
- 2 cups all purpose flour
- pinch of salt
- ½ cup ghee
- 1 cupwhite granulated sugar
- ⅓ cup water
Instructions
- In a amixing bowl add the flour, salt and ghee. Mix it around to form a crumbly texture. It should hold a shape when held tightly in your palm.
- Pour ½ cup water and using a rubber spatula mix it to form a rough dough.
- Then transfer it to a board and fold it multiple times for 2 minutes. Do not knead. This folding will create lovely flaky textures.
- Then form it into a ball and place it back in the mixing bowl. Rub little ghee on top and cover the dough.
- The dough will be very elastic at this time. So leave it aside for 30 minutes. This will allowthe dough to relax.
- After 30 minutes, roll the dough to 1 cm thin. Using a pizza cutter or a sharp knife, slice it into tiny rombus shape or rectangle.
- Place a skillet in medium low heat and pour enough oil to deep fry the dough.
- Once the oil heats up just a little, drop the shapes dough and let it fry in medium low heat for 5 minutes.
- Then crank the heat up to medium high and fry for 5 minutes. This will give the golden color. (Keep in mind that if you have to fry in multiple batches then let the oil cool down before you add the next batch to fry.
- Once you are done frying, prepare the syrup by placing another skillet at medium heat.
- Pour the sugar and water and mix it around. Cook the syrup until you get 1 string consistency. (watch the video to understand better)
- Drop the fried nimki/namakpare and toss it around constantly for 2 to 3 minutes. The sugar will crystalize and coat all the little bites.
- Shakarpare is ready. Enjoy it warm or store in an airtight container at room temperature.


Leave a Reply